Unity “Long exposure” VFX

I wanted to make an effect like what you get when you take a long exposure picture of a the night sky – the stars get stretched because of Earth’s rotation.

pexels-photo-169789

I first created about 500 star sprites in the scene in a rough half circle. I created a new layer called Stars.

I used a second camera to render the stars to a RenderTexture. That means the camera will not output to the screen but instead into a texture. In Unity you do this by assigning the Target Texture field of the camera.

The trick to retain everything from the previous render is to select the Don’t Clear option in the Clear Flags field of the camera. The Culling Mask field is used to tell the camera what layers it should render.

Captureasdf

To actually display the texture, I created a fullscreen Quad in the scene and added the render texture as a main texture to a unlit shader. I added a tween to rotate the stars and voilà:

ezgif.com-optimize

Well… almost! could we just clear the texture “a little” every frame to make the “tails” dissappear with time? On the CPU this could be done by the ReadPixels and SetPixels of the RenderTexture. But a faster way is to do it on the GPU with a shader!

Don’t worry – it’s very simple. You can create a shader with all the boilerplate code by right clicking the project window and selecting Create->Shader->UnlitShader.

Now we use the frag function, which is called for each individual pixel, to decrease the alpha value by a small amount each frame.

fixed4 frag (v2f i) : SV_Target
{
    fixed4 tx = tex2D(_MainTex, i.uv);
    tx.a *= 0.96;
    if( tx.a < 0.1)
    {
       tx *= 0;
    }
    return tx;
}


To actually use this shader, we first need to create a material that uses it. Then we use the Graphics.Blit function to run a texture through it. This function copies data from one texture to another and also applies a material on it. Because it is not allowed to Blit from a texture into itself, we need to create two RenderTextures and swap between them.

public void OnPreRender()
{
    Graphics.Blit(_renderTexture, _renderTextureTemp, _dimStarsMat);
    var temp = _renderTexture; // swap
    _renderTexture = _renderTextureTemp;
    _renderTextureTemp = temp;
}

A good place to call this code is in the OnPreRender callback which gets called on all scripts attached to a camera.

And that’s it! The finished effect now looks like this:

Hnet-image

The technique has many other uses. I tweaked the shader and added a displacement texture to create this ghostly smiley: 

fixed4 frag (v2f i) : SV_Target
{
    fixed4 noise = tex2D(_NoiseTex, i.uv+fixed2(0,_Time.x*8));
    fixed2 displ = (noise.rg - 0.5)*_DisplAmount*0.01;
    fixed4 tx = tex2D(_MainTex, i.uv+displ);
    tx.a *= 0.96;
    if( tx.a < 0.1)
    {
        tx *= 0;
    }
    return tx;
}

gifDuch
This was just a brief overview of how this effect works, find the full source code on github.

What do you think? Is there a simpler way to achieve a similar effect? Let me know in the comments or on Twitter.

Swarm of Fireflies in Unity

I’d like to show you how to code the movement of an organic looking swarm of flies in Unity.

The result looks like this:

roj1

Let’s start simple. We can make one fly move in a circle. First we need to define the Radius and Speed, then we make use of the Sine and Cosine functions (check here if you need a refresher).

private float t;
public float Radius;
public float Speed;
// Update is called once per frame
void Update()
{
    t += Time.deltaTime;
    transform.position = new Vector3(
       Radius * Mathf.Cos(t*Speed), 
       Radius * Mathf.Sin(t*Speed),
       0);

The result is very regular circular movement.

circle

If you try putting a different radius for X then for Y, you will notice the circle becomes an ellipse.

What if we kept the radius for X steady and changed the radius for Y with an interesting periodic function?

First I used the great Desmos  graphics calculator to play around with different functions, until I found one that looks natural.

image (7)

Plugging in the formula for radius Y  as a fraction of Radius:

var radiusY = Radius *
                      (0.5f + 0.5f * (
                           Mathf.Sin(t * 0.3f) +
                           0.3 * Mathf.Sin(2 * t + 0.8f) +
                           0.26 * Mathf.Sin(3 * t + 0.8f)));
        
transform.position = new Vector3(Radius*Mathf.Cos(t*Speed), radiusY*Mathf.Sin(t*Speed), 0);


and the result (with the path traced with a gizmo) looks very natural to me.

single

The rest is just spawning more flies and make their radius and speed random. Also negative speed can make some of them fly in the other direction.

ten

Connecting Unity Editor to Google Sheets

If you worked in Unity for a while, you’ve probably seen some plugins, like the I2 Localization, that can connect and sync with Google Sheets. It seemed like magic to me, so I decided to take a look at how it’s done and it turns out to be super simple.

Let’s start by creating a new google spread sheet. Selecting “Script Editor” from the top menu, will open a new tab with a sort of IDE for writing g-drive scripts.

New Project (6)

The Javascript API allows you to add menu items for custom functions and lots of other things. What we’ll use is that if you declare a function called doGet() you can listen for web requests.

Here is a script that takes the first 8 values in the spreadsheet and returns them in a JSON format.

function doGet(e)
{
  var result;
  
  var sheets = SpreadsheetApp.getActiveSheet();
  var values = [];
  for( var i = 0; i < 8; i++ )
  {
    values.push( sheets.getRange(1+i, 1).getValue() );
  }
  
  var result = {result:values};
  
  
  var JsonValue = JSON.stringify(result);
  
  return ContentService.createTextOutput(JsonValue.toString()).setMimeType(ContentService.MimeType.JSON);
}


Now click Publish/Deploy as web app and choose Who has access to this app – Anyone, even anonymous. Now you should get an URL that can be used to access this script from the outside. (You might also get a warning about using 3rd party apps).

Now let’s go to Unity and create a scriptable object to hold our values.

[CreateAssetMenu(fileName="MySO",menuName = "MyScriptableObject")]
public class MyScriptableObjectScript : ScriptableObject
{
    public int[] Value;
}


Now with a custom inspector we can actually write the web request, using UnityWebRequest. The only problem is we cannot use a Coroutine to wait for the result, so instead we need to check the state of the request on EditorApplication.update.

[CustomEditor(typeof(MyScriptableObjectScript))]
public class MySOInspector : Editor
{
    private UnityWebRequest _webRequest;

    public override void OnInspectorGUI()
    {
        DrawDefaultInspector();
        
        if (GUILayout.Button("Update from GDrive"))
        {
            _webRequest = UnityWebRequest.Get(YOUR_URL_HERE);
            _webRequest.SendWebRequest();

            EditorApplication.update += CheckForImportRequestEnd; // the only way to wait for a process to finish is with this
        }
    }

    private class GDocResponse // this class is used to parse the JSON
    {
        public int[] result;
    }
    
    private void CheckForImportRequestEnd()
    {
        if (_webRequest != null && _webRequest.isDone)
        {
            var result = JsonUtility.FromJson<GDocResponse>(_webRequest.downloadHandler.text);
            MyScriptableObjectScript myTarget = (MyScriptableObjectScript)target;
            myTarget.Value = result.result;
            EditorApplication.update -= CheckForImportRequestEnd;
            Repaint();
        }
    }
}


And that’s it. After pressing the button in the inspector, you should see the first 8 values from your google spreadsheet.

If you edit the spreadsheet script, make sure to publish it with a higher version number. Otherwise the changes won’t show when you call the URL.

The reverse – sending data from Unity to the spreadsheet – can be done using the doPost method with one argument and reading the incoming data from it. On Unity side, use the UnityWebRequest.Post method.

All source code can be found here: github.com/randalfien/unity-editor-scripting-tips

This is a second blog post in a series on editor scripting, check out the first part here.

Custom Unity Inspectors and Conditional Compilation

Custom inspectors in Unity are very handy to show and edit data on your behaviors and scriptable objects. To create custom inspectors in Unity you need to create a new class and extend Editor from the UnityEditor namespace. To tell Unity for which class the inspector is for, use the CustomEditor attribute.

A very simple custom Inspector for a class called TestBehaviour can look like this:

[CustomEditor(typeof(TestBehaviour))]
public class TestBehaviourInspector : Editor
{
    public override void OnInspectorGUI()
    {
        TestBehaviour myTarget = (TestBehaviour)target;
        myTarget.Variable1 = EditorGUILayout.IntField("Level", Mathf.RoundToInt(myTarget.Variable1/2f)*2);        
        EditorGUILayout.LabelField("Level", myTarget.Variable1.ToString());
    }
}

Sometimes it is useful to create custom inspectors even for built-in components like the Transform. For example for a 2D game we might exclude the 3D rotation options and the z axis for position and scale, to make it easier to use by artists and content creators.

The DrawDefaultInspector() method will draw all the default inspector editors for your target. Using this for the Transform component will look like this.snap

You can see that it looks quite different from the standard transform inspector which shows the Euler angles instead of the quaternions (the internal representation of rotation).

To create a simplified 2D inspector we can show just X and Y for position and use a single slider for the Z axis rotation in Euler angles. I also added a button for rounding the position to integer values.

[CustomEditor(typeof(Transform))]
public class TransformInspector : Editor
{
    public override void OnInspectorGUI()
    {
        Transform myTarget = (Transform)target;


        myTarget.position = EditorGUILayout.Vector2Field("Position", myTarget.position);
        myTarget.rotation = Quaternion.Euler(0, 0, 
            EditorGUILayout.Slider("Rotation", myTarget.localRotation.eulerAngles.z, 0, 365)
            );

        if (GUILayout.Button("Round Position"))
        {
            myTarget.position = new Vector3(
                    Mathf.Round(myTarget.position.x),
                    Mathf.Round(myTarget.position.y),
                    Mathf.Round(myTarget.position.z)
                );
        }
    } 
}

This will look like this:

snap2

It might be useful to go back to the standard inspector sometimes. That’s when conditional compilation comes in.

We can use #if FlagName in our code to tell the compiler to only compile the following code if the Flag is set. There are some flags automatically provided by Unity like the UNITY_EDITOR flag which can be used to only include code for use within the editor. We can set our own flags in Player Settings under Configuration/Scripting Define Symbols. More conveniently we can set these flags from code.

using System.Collections.Generic;
using System.Linq;
using UnityEditor;

public static class TestMenuItem
{
    public const string Flag = "USE_CUSTOM_INSPECTORS";

#if !USE_CUSTOM_INSPECTORS    
    [MenuItem("MyTools/Custom Inspectors On")]
    public static void CustomInspectorsOn()
    {
        RefreshCompilationFlag(true);
    }
#else    
    [MenuItem("MyTools/Custom Inspectors Off")]
    public static void CustomInspectorsOff()
    {
        RefreshCompilationFlag(false);
    }
#endif
    
    /**
     * Edits the custom symbols defined in Project settings. Triggers a recompile.
     */
    private static void RefreshCompilationFlag(bool value)
    {
        string definesString = PlayerSettings.GetScriptingDefineSymbolsForGroup(EditorUserBuildSettings.selectedBuildTargetGroup);
        
        List<string> allDefines = definesString.Split(';').ToList();
            
        if (allDefines.Contains(Flag) && !value)
        {
            allDefines.Remove(Flag);
        }
        else if (!allDefines.Contains(Flag) && value)
        {
            allDefines.Add(Flag);
        }
           
        PlayerSettings.SetScriptingDefineSymbolsForGroup(
            EditorUserBuildSettings.selectedBuildTargetGroup,
            string.Join(";", allDefines.ToArray()));
    }
}

What this code does it creates a custom menu items that allow us to turn this specific compile flag On and Off. What’s neat is that we use the same flag to only show the relevant one (only showing On when the flag is Off and vice versa).

png.txt

This blog post is the first part of a series about Unity editor scripting based on a lecture I gave to gamedev students at gamedev.cuni.cz .

The source code along with other resources can be found at github.com/randalfien/unity-editor-scripting-tips


Generating images from code with Photopea

Photopea is a free Photoshop alternative that lives in the browser. If you haven’t used it already, you should definitely give it a try! It’s fast, requires no installation and will feel very comfortable to anyone who is used to Photoshop’s interface.

The part I want to focus on is the scripting it supports – mainly how to make it generate a zip file with PNG images based on a template.

photopea

As in Photoshop, scripts are written in Javascript using an API for interacting with the elements in the document. The API can be a bit puzzling, so here are some common functions:

app.activeDocument.layerSets // get all folders in a document
app.activeDocument.artLayers // get all layers in a document (not in folders)
layer.visible = true/false // toggle layer visibility
layer.textItem.contents = "" // set text to a text layer
layer.translate(layer.bounds[0]-X, layer.bounds[1]-Y) // move layer to X, Y

I started experimenting with this because for our upcoming board-game we have data for 32 cards in Google Sheets – name, strength, abilities etc. Generating prototypes for printing by hand was cumbersome and error-prone. So I decided to automate it. Similarly you might generate business cards, invitations, etc.

The solution I came up with takes data from Google Sheets in JSON form (scripting in Google Sheets is for another blog post). Based on the data, it shows/hides some layers and changes the text in text layers.

Here are some utility functions:

function getLayer(s){ // finds layer by name
 var layers = app.activeDocument.layers;
 for(var i = 0; i < layers.length; i++ ){
  if( layers[i].name == s ) return layers[i];
 }
 return null;
}

function getLayerSet(s){  // finds folder by name
 var layers = app.activeDocument.layerSets;
 for(var i = 0; i < layers.length; i++ ){
  if( layers[i].name == s ) return layers[i];
 }
 return null;
}

function activateOnly(s, set){ // activates one layer in a folder
 set = set || app.activeDocument;
 var layers = set.artLayers;
 for(var i = 0; i < layers.length; i++ ){
  layers[i].visible = layers[i].name == s;
 }
}


For each data item, show the correct layers and text…

activateOnly( item.color +" border", getLayerSet("border") );
  
var namelayer = getLayer("Name Text");   
namelayer.textItem.contents = item.name;


Capture
Example layer structure

… and export it as PNG.

    var opts = new ExportOptionsSaveForWeb();
    opts.format = SaveDocumentType.PNG;
    opts.PNG8 = false;
    opts.quality = 100;
    
    pngFile = new File(item.folder+"/"+item.name+".png");
    app.activeDocument.exportDocument(pngFile, ExportType.SAVEFORWEB, opts);


Saving this script in a jsx file, you can drag it to Photopea to run it.

After the script ends, it spits out a .zip file with all the exported images in a folder structure. On my machine it generates 32 high-res PNGs in about 12 seconds – much faster than Photoshop!

There are some limits on what you can do, for example I haven’t figured out how to change the color of only part of a text.

Hope you find this useful.

Unity Transition Effects

In a gamejam game I worked on recently, I wanted to create a nice transition effect between two different “worlds”.

This is what it ended up like:

blog

In this blog post I want to show you how it works and how to create even better effects.

The two worlds in my case were two different Game Objects each with many children objects. For each world there is a separate camera. To make the camera only render the corresponding object, you need to assign each object to a different layer (check apply to children as well). Then set the camera culling mask to that layer only.

unityblog

For a refresher on multiple cameras, check out this excellent blog post.

In this case we have root2 on top of root1 (the order in which cameras render is determined by their “depth”).

We need a way to mask everything in the top layer. We can write a shader that only renders in the depth buffer and blocks everything else from rendering: 

 Shader "Custom/DepthMask"
 {
     SubShader
     {
         Tags {"Queue" = "Geometry-1" }
         Lighting Off
         Pass
         {
             ZWrite On
             ZTest LEqual
             ColorMask 0     
         }
     }
 }

For more info on how that works, check out this wiki page.

Now when we create a quad and assign a material with this shader, we can use it to hide parts of the layer. In the sample code, I added this to root2 and will use it show/hide this layer. You can also have a unique quad like this (I call it a “wiper”) in each layer.

The following script does some of the setup for the effect.

        public GameObject Root1;
	public GameObject Root2;

	public GameObject Wiper;
	
	public Camera Camera1;
	public Camera Camera2;

	private void Awake()
	{
		SetupCameras();
		
		Root1.SetActive(true);
		Root2.SetActive(false);
	}

	private void SetupCameras()
	{
		Camera1.clearFlags = CameraClearFlags.SolidColor;
		Camera1.depth = 0;
		Camera1.cullingMask = 1 << Root1.layer;
		
		Camera2.clearFlags = CameraClearFlags.Nothing;
		Camera2.depth = 1;
		Camera2.cullingMask = 1 << Root2.layer;
	}


The clearFlags are importing, because without them, Camera2 would render a solid color or skybox underneath our content, which would not be masked by the shader.

Next let’s animate things with DOTween, which makes it really easy to move stuff around without messing with unity animation system.

We start with the wiper fully masking the contents of Root2 and then move it aside. On subsequent transitions we always flip this tween.

	private bool _toggled;
	private bool _transitionActive;
	
	private void Update()
	{
	  if (!_transitionActive && Input.GetKeyDown(KeyCode.Space))
	  {
	    ToggleTransition();
	  }
	}

	private void ToggleTransition()
	{
	  _toggled = !_toggled;	
		
	  Root1.SetActive(true);
	  Root2.SetActive(true);

	  Wiper.transform.position = new Vector3(_toggled ? 0 : -31, 0, -9f);
	  Wiper.transform.DOMoveX(_toggled ? -31 : 0, 1.5f).OnComplete(OnTransitionFinished);
		
	  _transitionActive = true;
	}

	private void OnTransitionFinished()
	{
	  _transitionActive = false;
	  Root1.SetActive(!_toggled);
	  Root2.SetActive(_toggled);
	}


You can see that both “worlds” are only active during the transition. That’s useful when you want to stop any simulation or user interaction on the occluded layer.

If, instead of a quad, you use a circle mesh, you get this cool effect:

bloggif2

In 2D you can get similar effects with unity 2D mask, but this method works for any content 2D or 3D. You can also use it for two different scenes, loaded additively.

Full code as usual on github.com/randalfien/unity-transition-effect

You can also try the game (in browser!) on itchio

Scriptable Object Variables

ScriptableObjects in Unity are super useful for all kinds of things including creating variables as assets that make it really easy to test and debug your game.

If you don’t know what scriptable objects do, check out 3 Cool Ways to Architect Your Game With Scriptable Objects at Unity’s website.

In this post I want to expand on the information in that article and show you how to create an extensible system for variables of different types and how to easily save and load them from a file.

Extending Variable Types

First of all, if you don’t want to be stuck with just one type of variable (i.e FloatVariable), you need to figure out how to create new types without constantly copy/pasting code (BAD!).

C# generics to the rescue!

public abstract class Variable<T> : ScriptableObject {
	
	public T DefaultValue;

	public T RuntimeValue { get; set; }
	
	protected void OnEnable()
	{
		RuntimeValue = DefaultValue;
	}
}

Note that the DefaultValue is persisted (can be set from the inspector), while the RuntimeValue is only available during run-time.

To add a new type of variable, just declare a new class like this:

[CreateAssetMenu(fileName = "intVar",menuName ="Variables/Integer")]
public class IntVariable : Variable<int>
{

}

Now your Variables can hold any type! You can also use your own Enums or add other functionality like Min/Max values for the IntVariable.

Tip: Add a custom icon for any scriptable object by adding a square png to Assets/Gizmos with the name ScriptableType Icon.png, like so: IntVariable Icon.png (note the space).

Variable Persistence

The need to persist the runtime values of variables between game sessions quickly becomes apparent once you start using them. If you use a scriptable object as an inventory for your RPG game, how do you save its contents with your save file?

First of all, we need to find all variables of all the types in the project. For that we will need to introduce another abstract base class that does not use generics.

public abstract class BaseVariable : ScriptableObject

The whole inheritance chain should now look like this:

IntVariable --> Variable --> BaseVariable --> ScriptableObject

This way, we can actually have an array or a list of BaseVariables to hold variables of any type.

To hold the list of all the variables in the project, let’s create another ScriptableObject – Variable Manager.

[CreateAssetMenu(fileName = "varManager", menuName = "Variables/Variable Manager")]
public class VariableManager : ScriptableObject
{
	public List<BaseVariable> Variables = new List<BaseVariable>();

	private void OnEnable()
	{
#if UNITY_EDITOR
		Variables = new List(GetAllVariables());
#endif
	}

	// This method works only in Editor
	private static BaseVariable[] GetAllVariables()
	{
		string[] guids = AssetDatabase.FindAssets("t:BaseVariable");
		BaseVariable[] vars = new BaseVariable[guids.Length];
		for (int i = 0; i < guids.Length; i++)
		{
			string path = AssetDatabase.GUIDToAssetPath(guids[i]);
			vars[i] = AssetDatabase.LoadAssetAtPath(path);
		}
		return vars;
	}
}

inspector1

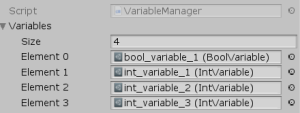
If you create a couple of variables of different types and run this, you should see a nice list with all your variables in the inspector of the Variable Manager. The list will stay populated even after you quit the play mode, because the data gets saved directly to the scriptable object.

You just have to remember to always run your game in the editor at least once before building your game whenever you add or remove any variables.

Now how to save and load the runtime values of all these variables? We need to somehow serialize and deserialize these different values. As it turns out, when working with a BinaryFormatter you can safely use the base class and it will correctly save all the data from the subclasses.  We can’t throw the whole scriptable object into the formatter, so let’s create a data class:

[Serializable]
public abstract class VariableData
{
}

And extend our generic Variable class so that every Variable type has a corresponding inner Data class.

	[Serializable]
	private class VariableData<TV> : VariableData
	{
		public TV Value;
	}
	
	public override VariableData GetData()
	{
		return new VariableData
		{
			Value = RuntimeValue
		};
	}

	public override void LoadFromData(VariableData data)
	{
		RuntimeValue = ((VariableData<T>) data).Value;
	}

Note: You should reuse the data object instead of creating a new one every time.

Now we can iterate over all of the variables, get their data, cast them to VariableBase, and save them with BinaryFormatter.

Note: Using BinaryFormatter means we need to constrain our variable types. Vector3, Color, and other Unity specific types will not serialize this way.

The problem is how to connect the values to the scriptable objects. Any references will not be serialized. We need to assign every variable a unique ID and then store all data as an (ID, VariableData) pair. We could generate our own ID, but Unity already has a globally unique ID (guid) for every scriptable object, so we can just use that. Extending our GetAllVariables function like this:

	private static BaseVariable[] GetAllVariables()
	{
		string[] guids = AssetDatabase.FindAssets("t:BaseVariable");
		BaseVariable[] vars = new BaseVariable[guids.Length];
		for (int i = 0; i < guids.Length; i++)
		{
			string path = AssetDatabase.GUIDToAssetPath(guids[i]);
			vars[i] = AssetDatabase.LoadAssetAtPath(path);
			if (string.IsNullOrEmpty(vars[i].Guid))
			{
				vars[i].Guid = guids[i];
			}
		}
		return vars;
	}

To wrap all this data and the basic methods, let’s create a new data class:

[Serializable]
public class VariableRevision {
	
	[SerializeField] Dictionary<string, VariableData> Data = new Dictionary<string, VariableData>();
	
	public void LoadFromList(List<BaseVariable> list)
	{
		Data.Clear();
		foreach (var v in list)
		{
			Data.Add(v.Guid, v.GetData());
		}
	}

	public void RestoreVariable(List<BaseVariable> list)
	{
		foreach (var v in list)
		{
			VariableData d;
			if (Data.TryGetValue(v.Guid, out d))
			{
				v.LoadFromData(d);
			}
		}
	}
}

Now we have all the pieces to write a Persistence Manager script that can save and load all variables.

public class VariablePersistence : MonoBehaviour
{
	public VariableManager VariableManager;

	private const string SavePath = "Temp/save.savefile";

	private void Start()
	{
		if (VariableManager == null)
		{
			Debug.LogError("No variable manager assigned!");
			return;
		}
#if UNITY_EDITOR
		VariableManager.RefreshList();
#endif
	}

	public void Save()
	{
		var revision = new VariableRevision();
		revision.LoadFromList(VariableManager.Variables);

		BinaryFormatter bf = new BinaryFormatter();
		FileStream file = File.Create(SavePath);
		bf.Serialize(file, revision);
		file.Close();
	}

	public void Load()
	{
		if (File.Exists(SavePath))
		{
			BinaryFormatter bf = new BinaryFormatter();
			FileStream file = File.Open(SavePath, FileMode.Open);
			var revision = (VariableRevision) bf.Deserialize(file);
			revision.RestoreVariable(VariableManager.Variables);
			file.Close();
		}
	}
}

The neat thing here is that we give BinaryFormatter a dictionary declared with only the (empty) VariableData type and it will correctly (de)serialize all of our properties, no matter if it’s a single int or some complicated data structure.

Check out the full code with a working demo on my GitHub!

Let me know what you think about this solution in the comments, I’m always happy to learn more!